Pages

Wednesday, 14 September 2011

Make The Ordinary Something Extraordinary!

If you been following along with me, you'll know I am working less and living more.  At the same time, I am restyling my home and grounds.  I've been self employed most of my adult life and I have discovered that not working equals not getting paid.  There are no sick days or vacation days. You can, of course, be sick or on holiday as much as you like but you will not get paid and you will have to catch your work up yourself.

This throws a teeny, weeny bit of a wrench in the financing of my home projects.  Hence, I have adopted a policy of thrift, gift, reworked and found for the non structural elements.  A lot of paint, some sewing and a wee bit of crafting can transform budget friendly items into pretty accents.

Since I'm still obsessed with transferring images, I picked an idea up from several sites to try it on wood and clay objects.  I found a great tutorial on Heaven's Walk for decorating clay pots.

I started with an ordinary $2.00 clay pot from the dollar store ~


You could transfer directly onto the pot.  I wanted mine to look old and weathered so I used gray and white craft paint, a sea sponge and paintbrush to layer on colour.  I dry brushed over the entire surface to mellow it all out.  To dry brush, dip your brush in the paint and then wipe it all off on a piece of newspaper.  When you think there is nothing left to paint with, it's just right for dry brushing!  Brush over the entire pot until the surface looks dull and aged.  Let the paint dry.

Eventually, this pot will hold a topiary on my kitchen window sill and I chose an image of an old, French chocolate ad from The Graphics Fairy.  You need to invert the image when you print it so the words read 'right side up' after the transfer.  (the words don't actually say 'right side up', just look 'right side up'!)  You can print on inkjet or laser for this project and can do colour as well.

I cut around the image to reduce the amount of excess paper and applied Mod Podge to the ink side with a brush.  I used outdoor because that is what I had at hand.  If the pot is only being used indoors, it doesn't matter which kind you use.


Carefully position the image on the pot.  The Mod Podge glues it in place.  Smooth out any air bubbles and let it set for a good twelve hours.  I left mine overnight.

In the morning, I got the paper quite wet with a sponge and starting rolling it back, from an outer edge, with my thumb.


This is kind of hard to do while you are trying to take a picture with your other hand!  The bottom layer of paper is glued on to the pot with the Mod Podge and won't come off unless you rub it too hard.  I did that with the edges of the gray shaded areas to make it look like a label that was peeling but be careful if you don't want that effect.  If you are using your pot outside, I'd recommend you use a spray sealer to waterproof it.

Here is the finished pot ~


These three clay pots are done with the same technique and I think they look extraordinary!


Have an extraordinary day!!!

Tuesday, 13 September 2011

A Day Of Connecting


Saturday was a fun filled day on my second most favourite street in Hamilton.  It was the twelfth annual Locke Street Festival.  I love the beautiful, old buildings and unique shops, bakery and restaurants at any time of the year but the festival is a special treat.  The street is closed to traffic, kids bouncy tents set up, store owners bring their wares outside offering special prices and extra vendors set up tents full of treats.


There was something for everyone.

Artists created ~


Street performers dazzled ~ 


And, of course, there was shopping!  

Here are the treasures I found!

I discovered Nature's Beauty by Denique.  Her line of 100% natural, hand made skin potions are very reasonably priced.  I bought the Unscented Body Butter, a Shea butter base skin cream that is wonderful!  It's nicely packaged but I have to repackage everything.  It think it looks lovely in this antique dressing table jar.


She gave me a sample of African Black Soap to take home and it's like washing in lotion!  This lovely lady has an Etsy shop and you can order online or get local delivery.  Check out her website and be impressed with the pricing!

The antique vendors had more treasures and they were bargains!


The authentic grain sack, all the rage in decorating, is in excellent condition.  The Girl Scout laundry bag is like new.  I bought the pair for $15.00!  The beautiful Irish Ceramics and Crafts Co. bowl was a mere $10.00 and the Fitz and Floyd shell bowl was $9.00.  You can find these vendors at the Freelton Antique Mall.

I did a little birthday shopping for my granddaughter's first birthday at Citizen.Kid.  I love their Eco friendly, fair trade policies.  I also love that their toys are not made by someone else's grandchildren and covered in lead laced paint.  

The best part of the day was completely unexpected.  At the end of the street is a tiny shop named Florence Dwelling.  They do readings, Reiki, crystal healing, past life regressions and so on.


On a whim, I asked if someone was doing readings that day.  They could just squeeze my sister and I in.  The rules were strict  - one question, one answer, ten minutes, $10.00.  I've never had any luck with psychics.  If they couldn't get anything about my present life right, I didn't have much faith they could see my future.  But, $10.00 isn't much of a gamble.

T. K. Atkinson did my reading and she got it all right!  I never even asked my question!

Since she knew what I wanted to ask, knew my past and knew my present, I'm going to believe she is right when she said my future is going to be great!  It's been a bit scary working less and living more and I haven't been exactly sure my new endeavours will be successful.  I felt a lot more comfortable as I left Locke Street and that is great value for $10.00!  Non festival rates are $40.00 for 1/2 hour and you can contact them at 289-230-0160.  It's more than worth it! 

So for my weekend, shopping = socializing = new friends = feeling contented.  That's because It's All Connected! 


Friday, 9 September 2011

I love Shopping For Home Decor!!!

One of the best things about working in interior design is getting paid to shop and you do it with someone else's money!  Sometimes the client doesn't really enjoy the retail experience.  I work very hard at covering up my amazement when they say this.  Usually, though, they are more interested in tapping into our expertise.  We are always out there sourcing new product, developing volume discounts and establishing accounts with trade only wholesalers.

We know the questions to ask about furniture construction, fabric wearability, installation regulations, uv durability, warranties and so on.  Your decorator is there to save you from costly mistakes on investment items, such as sofas, appliances, flooring and window coverings.

In the shopping section of this blog, I'll pass along that knowledge and take you on tours of our favourite haunts. We usually shop in southern Ontario but you can find similar outlets in any city.  It just takes a little digging to find them.

Some of the stores we regularly check out are lovely little boutiques that carry handmade and unique items.  Others are vast warehouses, flea markets, antique stores, discount retailers and consignment stores.  The boutiques, retail oriented kitchen and bath stores and furniture stores are easy shopping!  All the rest take practice, know how and a willingness to get dirty on occasion.  They take some imagination, some digging around and an ability to see what something can be.

It's a good idea to take a stroll through high end stores.  Top notch designers have put together the show room looks.  Once you've absorbed all their ideas, go looking for a better deal or something that can be altered to look the same.

The first place you have to hit, and my idea of a good time, is the Ottawa Street Fabric district in Hamilton.  The area developed in the 1920's as outlets for local textile mills.  It's had ups and downs over the decades but now is revitalized and worth taking a day trip. This is Canada's largest textile district and there are over a dozen fabric stores; some of them huge!  There are plenty of consignment and antique stores and good restaurants. On Saturdays there is a farmer's market.  And, it's the home of the first Tim Horton's!

My favourite store on the street is Ottawa Textiles.

Mmmm - miles of bolts of fabrics ~ 


Oooooo - fabulous drapery hardware ~


Awww - tassels and trims ~


Best of all - the sale section upstairs ~ 


Fabrics that upholsterers or seamstresses charge $80 - $200 a yard for can be found for under $25.  The service is excellent in this family run business and the staff is always happy to help you with advice on yardage amounts and what type of fabric will wear best for your application.  They even cut you a small sample if you need to take it home to try out!

If you are redecorating any time soon, you can't afford not to make the trip to Ottawa Street!

Thursday, 8 September 2011

An Old Bridge And Some Pooh Sticks

When I was a child, one of six in our family, I lived in an old house which was surrounded by forest.  The only building within a mile was a two room school.  My dad was principal of that school and teacher to myself and two of my brothers.  We called him Sir at school and Dad at home and the two worlds never seemed to conflict.

This is my dad in his office.  Isn't he natty in his leisure suit? ~

 
The winters in Northern Ontario are long and harsh and our ancient, black and white television was rarely in working condition.  So, we read books.  We read lots and lots of books!  My dad would read out loud to us in the evenings.  Mom would knit or mend and rock the baby to sleep.  The rest of us, from my high school age sister to my primary age brother, gathered around and listened.  I know this sounds impossibly like a Hallmark Christmas film, but it's honestly what we did!

A favourite book from that time was Winnie The Pooh by A.A. Milne.  I think it was pivotal in forming my understanding of human nature.  I would listen to someone and think, "What a gloomy Eeyore" or "Don't be such a nervous Piglet"!  I've met many an Owl that thought they were more clever than they were and loads officious Rabbits.  At times, I have been all of these things myself.  I've even known a lovable Christopher Robin, for Christopher was the name of that well loved baby my mom was rocking to sleep.

I revisited Pooh and all the characters of the Hundred Acre Wood when I read The Tao of Pooh by Benjamin Hoff.  He describes Pooh as a Taoist Master, venerable philosopher and great teacher of effortless, calm and reflective living.  He quotes from the original book and is just as funny in his analogies.


As you can see the book is becoming a little dog eared as it has moved from a delightful read to something of a self help reference book in my library.  Hoff reminds me not to,  "Think too much and care too little."  and says, "...that mistake cannot continue for much longer if everything is going to survive.". 
I walk back to this lovely old bridge and remember my daughters playing Pooh sticks here many years ago.  Remember the game of tossing sticks in the water on one side and waiting to see who's stick comes out first on the other?  I'll share that image with you and we'll all have a Pooh style do nothing moment!


Wednesday, 7 September 2011

Fall Is In The Air

~And I Am In The Kitchen~


The day is chilly and rainy so what better time for doing some preserving!  The garden is giving me green peppers and onions.  I have some cucumbers left after making dill pickles and this says Green Barbecue Relish to me.

This recipe comes from a pamphlet put out by Heinz sometime in the 70's.  It's a miracle that it has real food ingredients!  Gourmet in that era usually involved dumping a bottle of barbecue sauce or a can of soup into the mixture.  Yuk.


This is easy to make, all natural and tastes Tony the Tiger great!  (sorry 70's fashback)

Take some of this ~


I use all natural vinegar.  It think the regular stuff is pretty close to mimeograph fluid.  You would have to have been around in the 70's to know what that is.  Just trust me on this not being a good thing.

Carefully, cut the cucumbers, onions, and peppers into tiny, uniform size pieces.  Kidding!  Toss them in a food processor and finely chop them.

Dump that in a bowl.  Please notice the beautiful yellow bowl.  It's vintage and made by Medalta Potteries in
Medicine Hat, Alberta.  My grandfather, Jesse (Will) Wyatt was one of the founders and acting superintendent of that pottery.  I love that bowl!


Also, take note of my new measuring spoons.  They are rectangular and very chic.  I have an old set but they are unexciting because they are round.  The new ones also have a 1/8th measure which comes in handy now I am cutting recipes to feed one person.  If you feel you can't live with round measuring spoons any longer, I recommend Norpro 8/10 stainless steel.  If Norpro takes this as a product endorsement and sends me a bunch, I'll pass them on to you.  I can really only use one set.

Leave the veggies in the Medalta bowl, sprinkled with the salt from the rectangular measuring spoons, overnight.  If you live in a house with three cats, I recommend a lid or it becomes a big, salty water bowl for them and your relish will have cat spit in it.  Ewwww!


In the morning, drain the veggies and rinse with cold water.  Drain again.  In a large, stainless steel pot boil the vinegar, sugar and spice bag and reduce heat to simmer for 10 mins.  Add the veggies and heat to boiling point.  Stir, occasionally with the cool, wooden spoon a friend brought back from Greece for me.  I think it is made in Meteobo.  I can't be sure as the Greeks seem to be a nation of dyslexics and write some letters backwards.  I can make dyslexic jokes because I am one.


Pack into hot, sterilized jars.
~Done~


Here is the recipe:

Sweet Green Relish ~
12 small cucumbers, unpeeled (4-6")
2 medium onions
1 medium green pepper
3 Tbsp. coarse pickling salt
1 1/2 cups natural, white vinegar
! 1/2 cups brown sugar
2 Tbls. mixed pickling spice tied in cheesecloth
Chop veggies finely
Sprinkle with salt and let stand overnight
Drain and rinse
Bring to boil vinegar, sugar, spice and simmer 10 mins.
Add veggies and heat to boiling point.
Pack into hot, sterilized sealer jars.
Makes 3 pints

This recipe turns out best if you are listening to the Carly Simon Hotcakes album and wearing flares.


Tuesday, 6 September 2011

All Things Are Better When You Are With Friends


I love this campfire girls image I downloaded from The Graphics Fairy.

It says so much about the beauty of sharing as the girls join together to cook and play.  Because they are together, the forest is a happy, comfortable place.

As I drove into my little village this evening the sky was dazzling with a brilliant sunset bursting through the clouds.  This is a happy, comfortable place that is full of friends!


In this village, I have a friend who is terrified of lightning.  I mean, she actually screams when a bolt streaks across the sky.  She has written about her fear on her blog, Her-ballistic Garden.

Recently, six of us were gathered at her house when a humdinger of a storm broke out. Power failed, tornado warnings were issued and lightning was reported as 1000 bolts per hour.  We oohed and ahhhed at the spectacle.  We lit candles and opened a bottle of wine.  We sent and received text messages from family and friends, checking to see if everyone was safe and sound.  It was exciting!  And, there was my friend, standing at an open door, snapping pictures of the lightning with her iPhone and oohing and ahhhing along with the rest of us.  She was not afraid!


The blogging world, to me, is a whole lot of friends making everything better.  We comfort, share, teach, inspire and enjoy things together in a spirit of camaraderie and support.

I thank my first BFF in the blogging world.  She doesn't know we are BFF's, but the search for an old fashioned recipe led me to her site, The Pioneer Woman.  I visit with her everyday.  I rejoice when she succeeds and worry when her success means she works too hard.  I buy her books and try her recipes.  I am her stalker fan!  She led me to The Lettered Cottage and that led me to Ticking & Toile where I learned how to do those cool image to fabric transfers.  It just keeps going!

My sister and I have partnered in two home decor stores and, for many years, as interior decorators.  Our tastes are as different as our personalities.  Our businesses and designs have always benefited from having double the ideas and effort.  We benefit, personally, from having the support and encouragement of the other and our lives are enriched by sharing the things we love.  It is a blessing to have my life so intricately connected to my sister.

I love my connection to my friends!  I love my connection to you!  We are together and we are not afraid!  We can ooh and ahhh over everything this wonderful world has to offer!

Designer tip ~


When designing rooms used for socializing, pay careful attention to furniture placement.  You want your guests to be comfortable and to encourage conversation.  A U shape works the best.  An L shape is the least comfortable.  You can anchor the furniture grouping with an area carpet or by its reference to the focal point in the room.  This could be a fireplace or the view from a large window.  A table should be placed within easy reach of each seat.  In small spaces, nesting tables are great as they can be tucked away when not in use.

Different styles and intensity of lighting help set the mood to suit the occasion.

Add some accessories that have meaning to you and will be of interest to your guests.  This could be a family heirloom, a piece of art or a collection of seashells.

Make sure all walkways are at least 36" wide to allow for easy traffic flow.  That encourages your guests to move around the space and interact with each other.

Try the room out yourself!  Sit in all the chairs and use the tables to be sure it all works comfortably.

Add friends and family and the room is done!


Monday, 5 September 2011

Citrasolv Fabric Transfers or Who Thinks This Stuff Up?

When my brother was taking an anthropology course in university and I was writing typing his essay, he described a tribe native to California who had a diet revolving around acorns.  They took the inedible nuts and  did some labour intensive and time consuming process of burying them in the sand and building a fire on top to roast them. After about fifty more steps, they could make them into flour (or some such thing) and cook with them. 

I was thinking, "Who the heck sat around thinking that up?  Was he/she an oddball food inventor in the tribe?  Wouldn't it be easier to think up a boat and get protein from the vast Pacific Ocean?  Or, why not move to some place that had walnuts?".  I can feel the anthropology majors cringe as they read this!  Anyway, someone figured it out.  

My introduction to transferring images from paper to fabric strikes me the same way.  Someone figured out you could use a natural cleaning product, Citrasolv, and a toner based, laser printer to get an image to transfer from paper to fabric and it would be washable!  I think that person was very odd!  I love that odd person!  

After seeing the tutorial on Ticking & Toile, my sister and I downloaded this image of seahorses from The Graphics Fairy to use on the chaise lounge cushion.


Wild with excitement from that success we were full of ideas!  

Here's the process ~

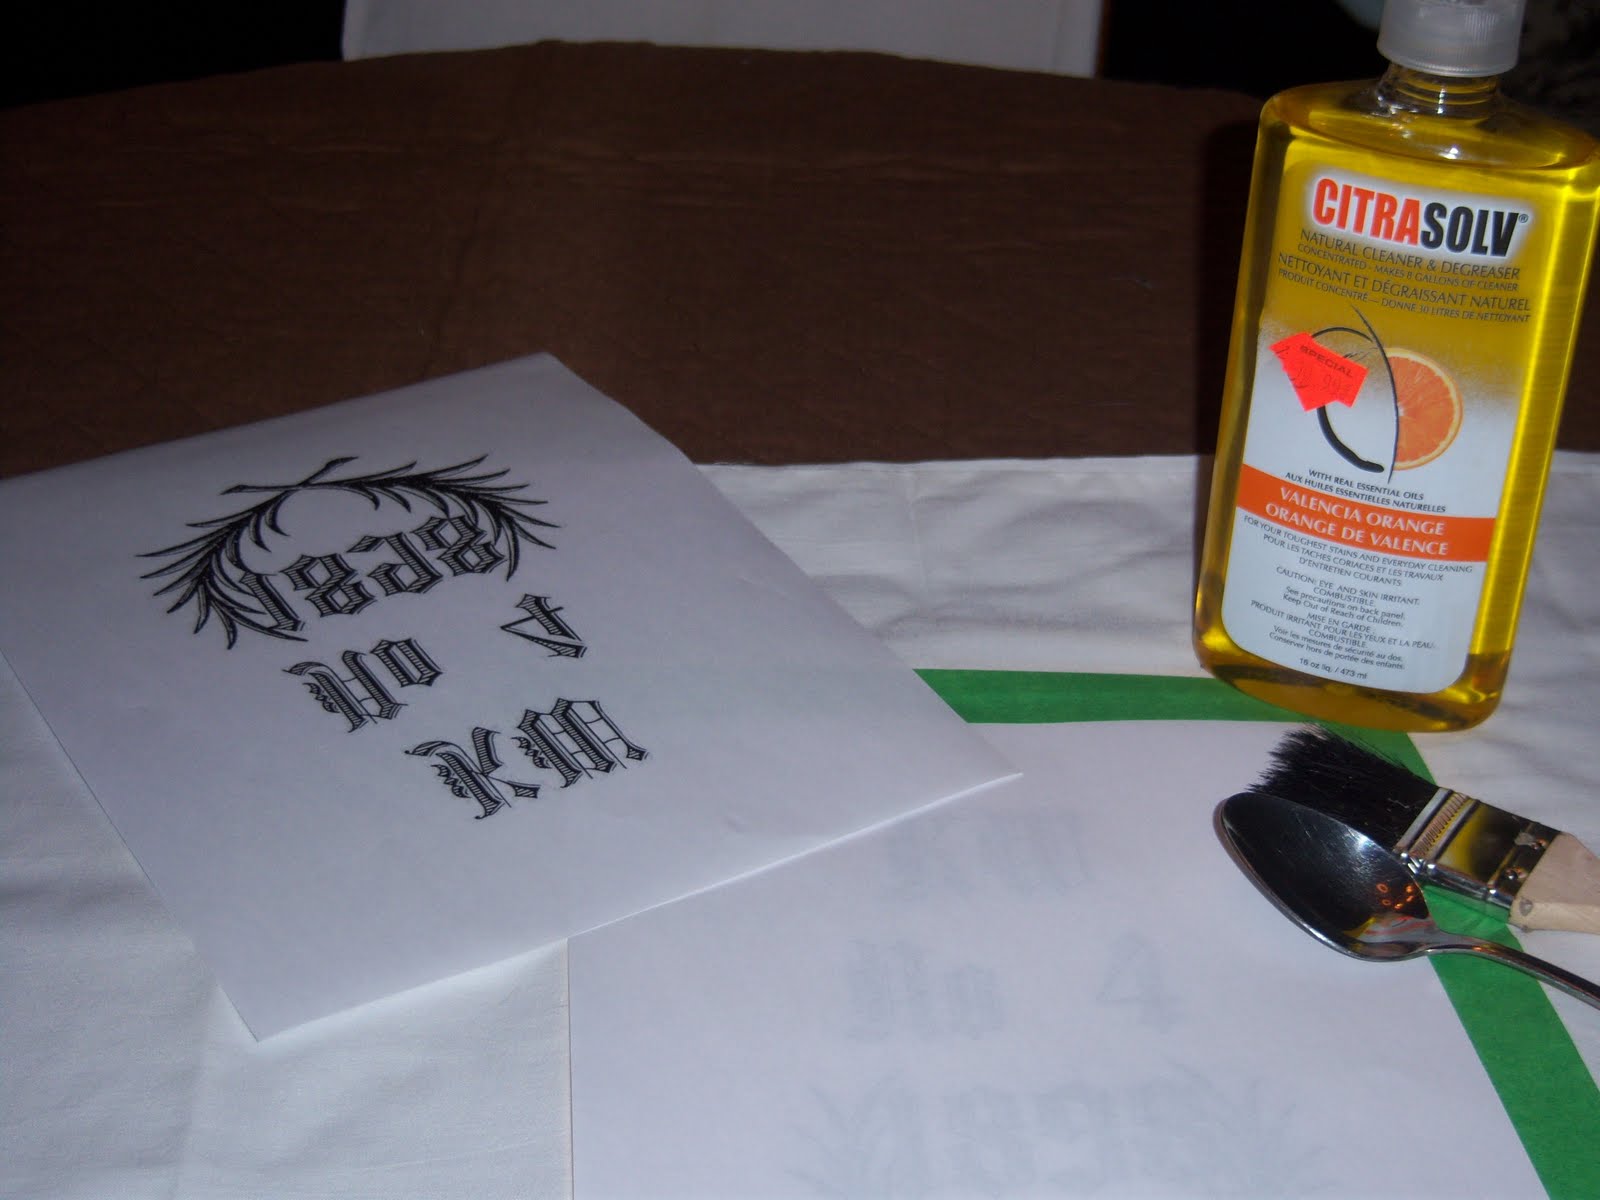
I chose an image, sent it to my desktop, flipped the image to invert the text and printed it on my laser printer.  If you don't have laser, office supply places will do a copy for you.  This will not work on an inkjet printer.

We used a table protector pad to provide a surface with a little give.  Since this was a pre-made pillowcase,   it was necessary to insert something between the two layers to avoid bleed through.  An old file folder worked perfectly.  

The image was taped, ink side down on the pillowcase.  You don't want it to move or your transfer will be smudged.


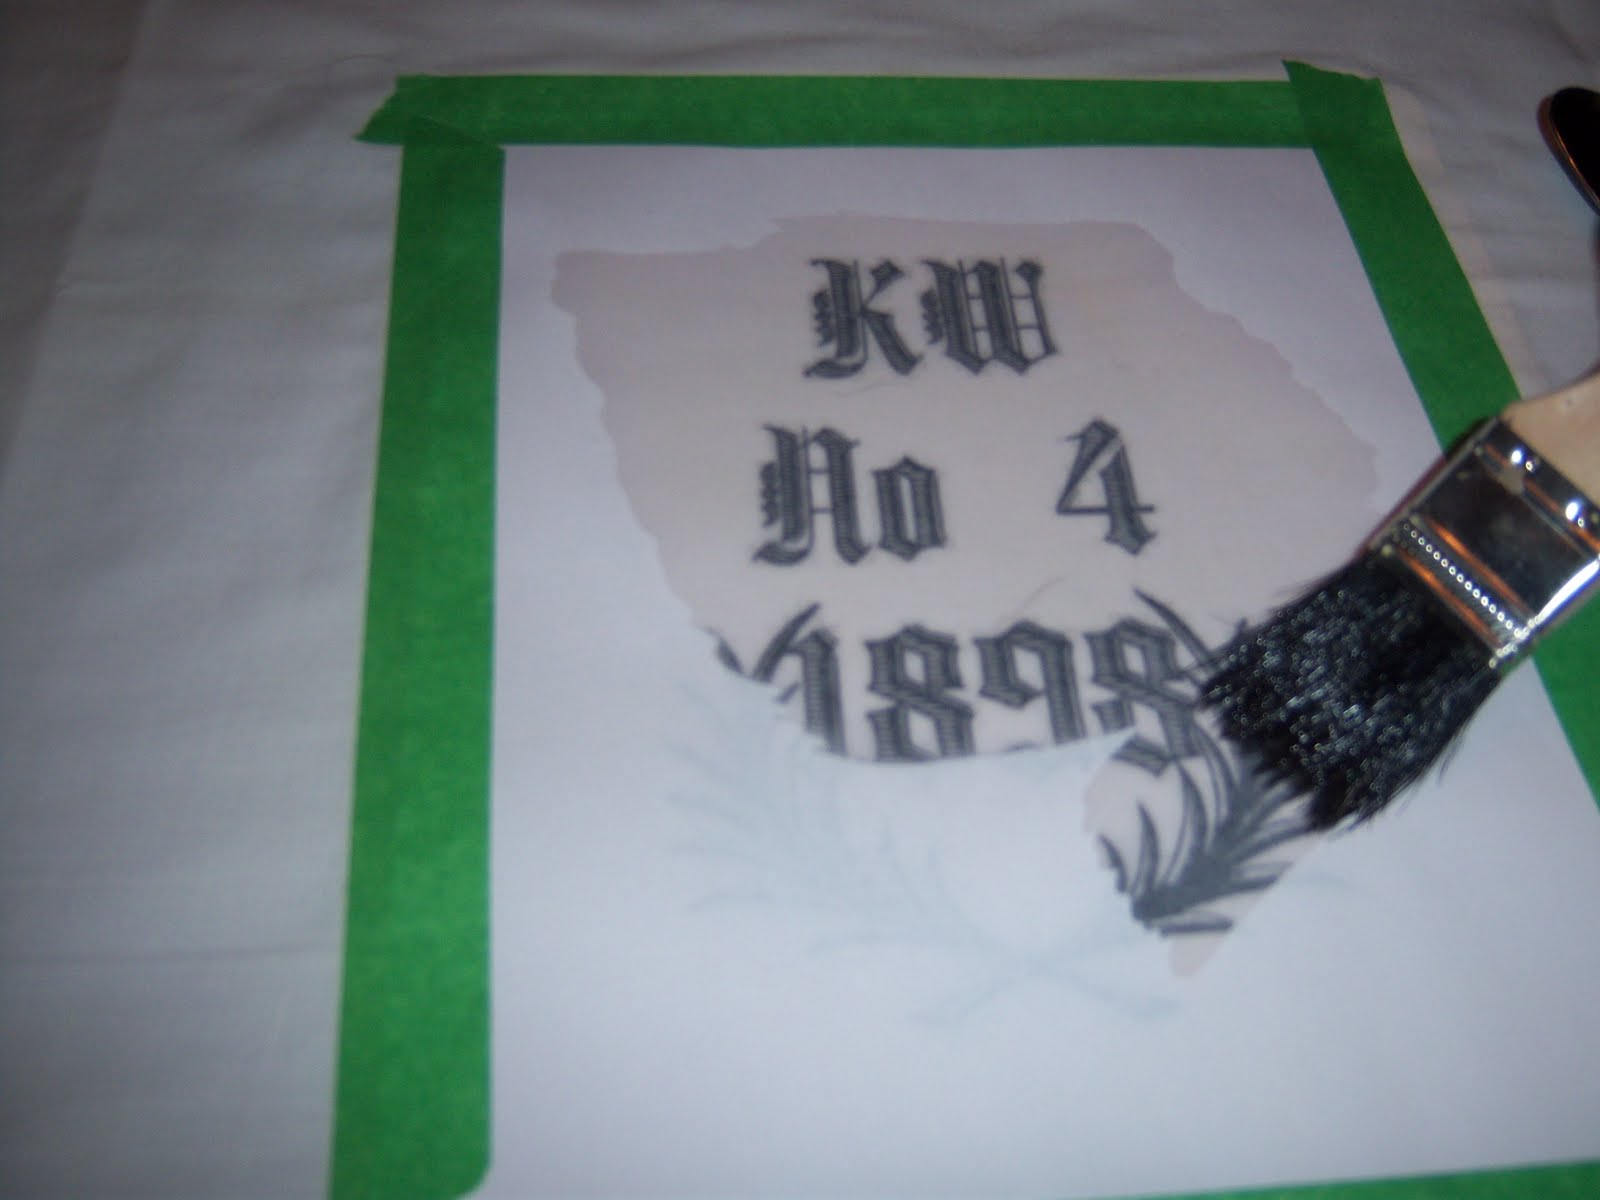
The Citrasolv was applied with a paintbrush.  You want to be sure you get good coverage but don't overly soak it.


Let it sit for three to four minutes.  No peeking!


Start rubbing with a spoon.  This takes a fair bit of pressure and the edge of the spoon's bowl seemed to work best.  Be careful not to tear the paper.  This step took about four minutes.  You will know the image is transferred when the black fades to grey.


Carefully, peel back a corner of the paper and check the transfer.  If it is dark enough to suit you, peel back the paper and discard.


Let the fabric dry for a few minutes.  Iron the transferred image to set it.  Do not use the steam setting on your iron.

~Ta Da~


Images are most clear on a tightly woven fabric like cotton or muslin.  The vintage linen napkin below was a slightly looser weave and the image is a little greyer.  I love it, anyway and think I'll do a whole set with antique chair designs.  What an easy way to do monograms!


I'm off to do a table runner, placemats, hand towels, tea towels and anything else I can dream up!!!

PS - To answer the question of how long you iron - 2 or 3 passes (no steam) will set the image.
     - To answer the question of how well it washes - I've washed pillow cases three times and they are fine.
     - To answer the question of what is Citrosolv - It's a natural cleaner found at health food stores or online